
The Krazy Jimmy is a hopper pattern inspired by the first dry fly I learned to tie (Crazy Goof) and the Gartside Pheasant Hopper, which I learned to tie from Jack Dennis’ Western Trout Flies, Vol II. I fished with the pheasant hopper almost exclusively when I first discovered it and it gets credit for most of the large trout I’ve caught on a fly rod. I love hopper fishing. The flies must be tough, or you waste a lot of time tying on new flies every other fish. That is why the pheasant hopper appealed to me. Now with new materials, I stole bits and pieces from some great patterns to make what I call the Krazy Jimmy. The fly is not very expensive because a sheet of the foam at a craft store is about a dollar (a sheet will tie dozens of flies) and ring-neck pheasant skins are pretty easy to get from anyone who hunts pheasants.
This batch of Krazy Jimmys is headed for my best friend, Jim, in Montana. He is the namesake so I hope they serve him well.
I can tie one in a couple minutes & they are good for at least a couple dozen fish. Which is necessary since Jim loses a lot of flies.
I hope to use some too. Maybe he’ll let me borrow a couple.

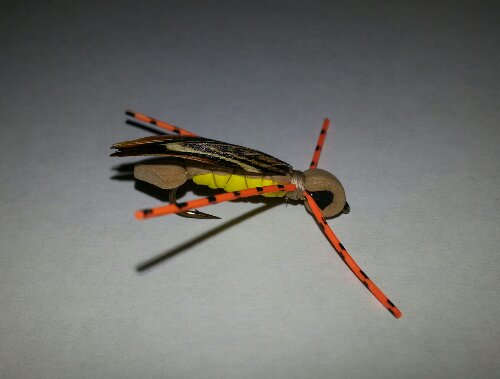
KRAZY JIMMY
HooK: 2x Size 8-12
Thread: 140 tand
Body: Yellow closed-cell 2mm foam cut into thin strip and wrapped around the shank
Head and Tail: Tan closed-cell 2mm foam tied down on the body
Legs: Yellow/red, orange/black or olive/black medium round rubber and 2mm closed-cell foam (optional)
Eyes: Black closed-cell foam
Wing: Ring-necked pheasant back feather that has been coated in head cement after the fluff has been stripped from the stem.
Begin by tying in the thread just behind the eye and laying down a good base. Tie in a strip of yellow foam that is 1/8 in wide, beginning 1/4 the shank length behind the eye. this will be the marker on where to leave room for the head. Tie the foam back to the bend and then wrap forward and tie off. Next, cut a strip of black foam, that is 1/16 in wide and 1/2 in. long and tie it in perpendicular to the shank just behind the eye. This forms the hopper eyes. Next, rotate the hook so the point is up and tie in a strip of tan foam that is 1/8 in wide and twice the length of the shank. Cut a point on the end and tie it in so the strip is towards the eye. Mark where the eye meets the foam and use scissor points to punch a hole. Rotate the hook back to point down and pull the foam forward, around the eye, push the eye thru the hole and bring the foam over the top of the eyes and tie it off with two wraps at the end of the body. Continue to pull the tan foam back across the top of the body and make 3 wraps down the body securing the tan foam on top of the yellow foam. Make 3 turns at the end of the body, being careful not to cut the tan foam and then make 3 wraps forward, crossing the first 3 wraps and forming an “X” pattern on the top and bottom of the body while returning the thread to the joint behind the head. Trim the tail to a point 1/8 in past the bend.
There are two ways to tie the legs. For smaller flies, I use just the rubber. For larger flies, I tie in a compound leg.
Rubber Legs only – Trim two pieces of round rubber that are 2 times the shank length. Tie the rubber legs with 3 wraps, one leg on each side of the body with 1/3 of the leg forward of the tie in point and 2/3 aft. This is the fastest and easiest method for legs.
Compound leg – Cut a tapered upper leg out of 2mm foam the that is slightly longer than the fly body. Then cut round rubber the same length and tie an overhand knot near one end. This knot becomes your anchor to secure the rubber to the foam. You can either use thread to bind the rubber to the thin end of the foam leg or use your bodkin to poke a hole in the edge of the leg and thread the rubber though. the upper leg with foam and then thread the rubber through the foam, securing with a touch of UV cement. Once I have assembled the legs, I tie them in at the segment created by the 1st set of wraps holding the upper body in place. Then I tie in a set of legs at the back of the head, as described above. This adds both realism and buoyancy to the fly in larger sizes.
Next tie in the pheasant feather so the stem is pointed to the tail and the feather is over the head, curve up with 3 wraps. Trim the stem off and pull the feather back towards the tail and secure with 3-4 wraps. Whip finish and apply head cement to the joint.
This is a low profile highly buoyant fly that will catch fish anywhere they eat hoppers. And you won’t mind losing one or two in the brush.


